TRY THIS PROCEDURE AT YOUR OWN RISK!
I take no responsibility for any damage done to your computer, your monitor, or yourself while following these instructions.
Things you will need:
Two computers
One will be displaying the cross-hatch test image on the monitor while the other will be running Windas and plugged into the FW900 monitor via serial port and Windas cable.
Nokia Monitor Test
We'll be using this to generate the cross-hatch test pattern. Though, the version at this link is newer than the one I used when generating screenshots below. But it should still work.
Windas
If you received Windas from someone as a stand-alone executable, you may find that dynamic convergence does not work with it. If this is the case, you'll need to install and patch Windas manually from scratch per the instructions at the link above.
Windas Cable
Please visit this thread on [H]ard|OCP to find vendors for the proprietary Windas cable that is needed to communicate with your Sony monitor.
Computer #1 (non-Windas computer)
This is the computer that will be displaying the cross-hatch pattern on the monitor.
First, disable any screensaver and/or power savings on this computer. This is so the test pattern won't be constantly disappearing while you work on the monitor.
Set display resolution to 1920x1200 at 85Hz. This is the resolution that Windas will expect/require to properly converge the monitor.
Launch Nokia Monitor Test. . .

Click the geometry button.
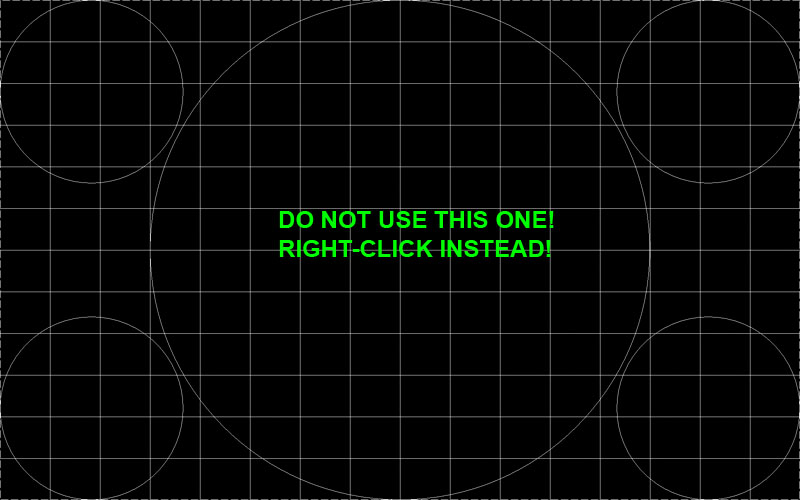
You should see a cross-hatch pattern. However, this cross-hatch isn't "dense" enough for our purposes. Though the image above says that you should right-click, if you have a newer version of Nokia Monitor Test than that pictured, you may need to left-click instead until you see a more dense, white cross-hatch like the one below. . .
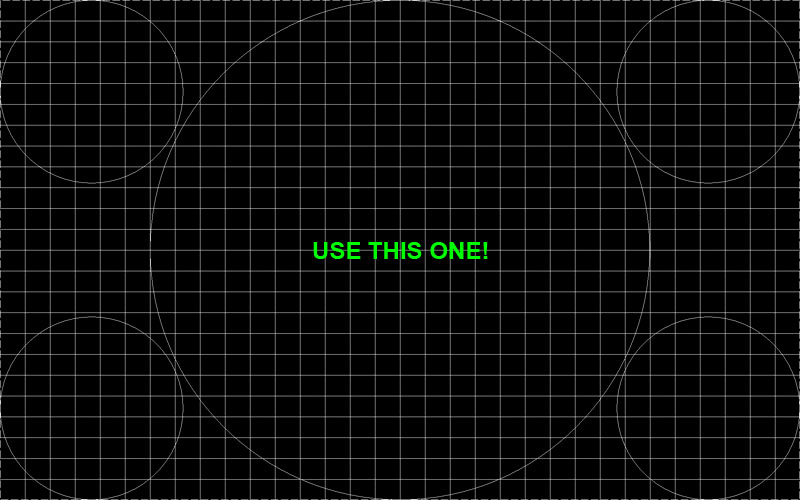
When you see the white, dense cross-hatch, we're all done with the Computer #1. Now it's time to fire up Windas on the other computer.
Computer #2 - Windas Computer
Disable all power-saving features and screen savers on this computer as well. You don't want your computer to go to sleep in the middle of converging your set while you're taking a break to rest your eyes (staring at grids can be very hard on the eyes!).
These instructions assume that you are fundamentally familiar with Windas and have configured it properly by selecting your monitor model correctly and makings sure it is using the proper COM port on your computer. There are instructions elsewhere on the web on how to do this.
First things first. We need to backup your monitor's current configuration so that we can recover if something goes horribly, horribly wrong. With your monitor connected to your computer (#2) via Windas cable, select File-->Save Data to File. .
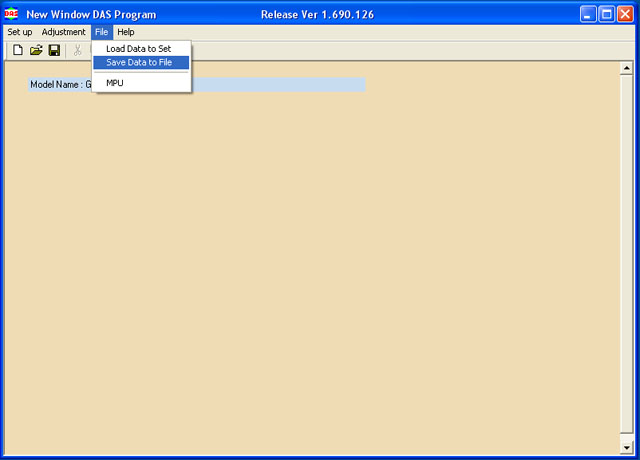
You'll be prompted to type a filename. Name it something distinct and then press "GO." Your monitor will turn itself off while the transfer is made. It may come back on momentarily only to turn off again. When the transfer is fully completed, the monitor will turn itself back on and stay on. Make sure you keep the created file in a safe place!
Now it's time to enter "Dynamic Convergence Mode." Click Adjustment-->DCnv

You should then see the screen below.

Click SEL

Click OK
Nothing may happen for a few moments. However, eventually, the following should appear. . .

Click Bypass
Your monitor will "click" and/or turn off briefly when you do this.

Similar screen as last one.
Click Bypass
This time, your monitor shouldn't do anything funky. Instead, you will see the following. . .

Note the two windows (the one on the right may be partially obscured and you may need to drag it out so that it is beside the left-hand -pink- one).
The window on the right is a representation of your monitor. Each of the squares is a point of adjustment for your monitor's convergence. When you click "OK" on the left-side window, you will note that an asterisk appears in the grid in the upper-left corner (A-01). This is where Windas assumes you will want to begin adjusting convergence (and it's a good place to start!).
When you click OK, the left-side window will change and show four scroll bars (I FORGOT TO TAKE SCREENSHOT! D'OH!). You need only worry about the top two scroll bars. The top one adjusts vertical convergence for the current point. The second scroll bar adjusts horizontal convergence for the current point. I wasn't able to do anything useful with the latter two scroll bars. When you are done with a point, you click "OK" and you are automatically moved to the next convergence point to the right on the grid. When you finish a row, you will be told that you are about to converge the following row with a message similar to that shown in the screenshot above.
Ideally, you'll have the time (one-to-three hours depending on how picky you are) to start at the top as directed and go from left-to-right, converging each point and working your way down row by row until you end with the point at the lower-right (I-15).
You can skip around by clicking on the right-side grid. However, each adjustment point subtely alters the ones around it. So while hopping around to touch up some spots or just make a quick fix on an egregiously out-of-convergence spot is possible, for best results, you should start at the upper-left corner and work your way down.
Again, when working your way down, click "OK" after adjusting each point via the sliders and you will be moved to the next appropriate spot. You shouldn't have to (nor would you want to) click on the grid at all unless you need to go back or feel you want to skip ahead (not recommended).
Here is what you should see as you move the top slider left or right. . .

Notice how the white vertical lines break apart at this convergence point into their component colors (red, green, and blue). Green remains stationary while red and blue move. I've found the best way to converge televisions and monitors is to error on the side of getting red right since "red bleed" is much more attention-grabbing than blue fuzzy edges. Move the slider back and forth you'll see the red and blue lines gradually bow out and then back in. . . eventually switching sides relative to the green line as you move the slider back past the middle and to the other side. I usually do this a few times to get a feel for the "range". . . and then slowly adjust it back to a white line, being careful to hide any hints of red first, then checking to make sure that blue hasn't crept out too much and given the white line a fuzzy blue edge. Of course, while adjusting for blue, you might introduce some red. It's a balancing act. But if your monitor is decent, you should be able to get nice white lines that are nearly perfect, nearly everywhere on your monitor.
Of course, the second slider adjusts the horizontal lines in much the same way. Do the vertical, then the horizontal slider, then click OK to move to the next point. Again, there are four sliders (wish I had remembered the screenshot!), but the latter two aren't necessary and I never found any point to adjusting them.
You'll find that some adjustment points on the grid are more "sensitive" than others as you move from point to point. Generally speaking, the left side of the monitor is more sensitive than the right. And the center is less sensitive than the edges. This is normal.
SAVING YOUR ADJUSTMENTS
This has confused some people. Some have taken hours to converge their monitors, and then found all their work wasted when the convergence is "forgotten" by the monitor the next time it is turned off.
In order to save your settings to the monitor, you must either finish adjusting each convergence point until you reach the last point (I-15), then click OK, which will take you to the following screen where you can save your adjustments. . . or. . . if you just want to adjust a point or two and then save your adjustments, you can click the I-15 box on the grid and then click OK as well. Either way, you should see the following. . .

Click OK. . . and then you should see a message stating "Data Saved" (not pictured). At this point, your convergence is saved to your monitor. Congratulations! You can now exit Windas and even turn off your monitor without losing the fruits of all your hard work. At least, that was my experience.
Creating a New Backup with Convergence Values
At this point, I highly recommend that you do another data dump of your monitor's settings (don't overwrite your old file!). If you converged the whole monitor, you may have spent up to two or three hours hunched over your monitor, staring at a white grid while your eyes got more and more sore. So, it's a good idea to backup the results of all that hard work just as we did at the beginning. . .

You know the drill from here. . .